Restore Vintage Leather Handbags: 7 Steps to 15% Resale Value Increase by 2026
Advertisements
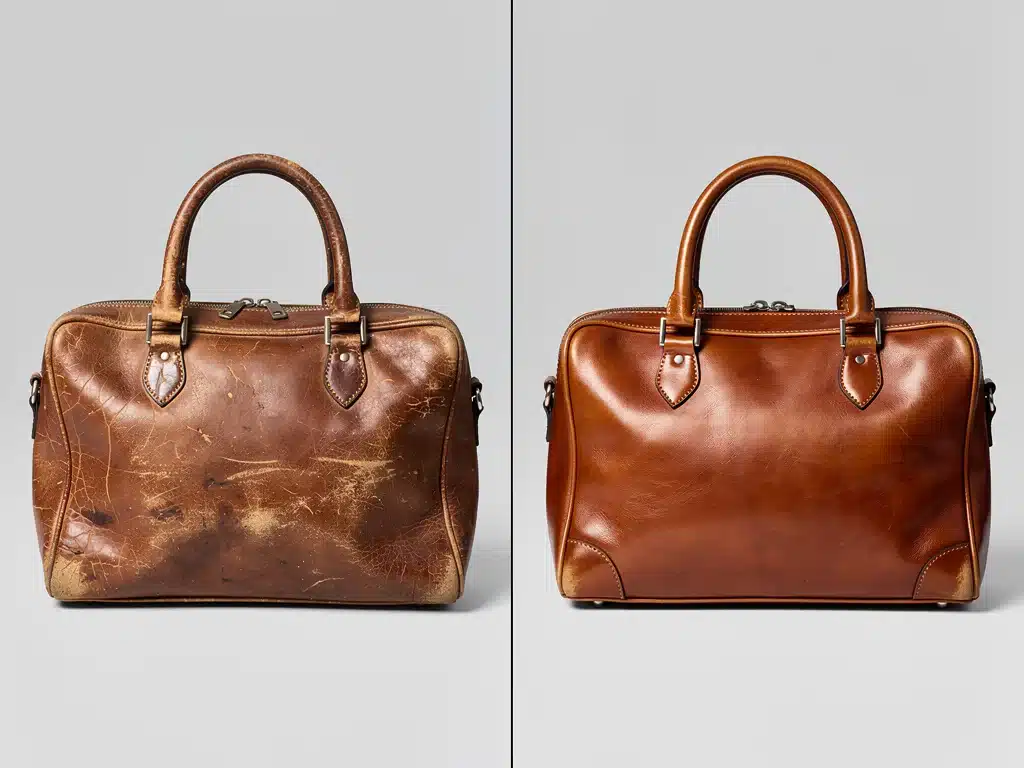
Restoring vintage leather handbags through a meticulous 7-step process can significantly increase their resale value by 15% by 2026, transforming forgotten pieces into valuable assets for collectors and enthusiasts.
Advertisements
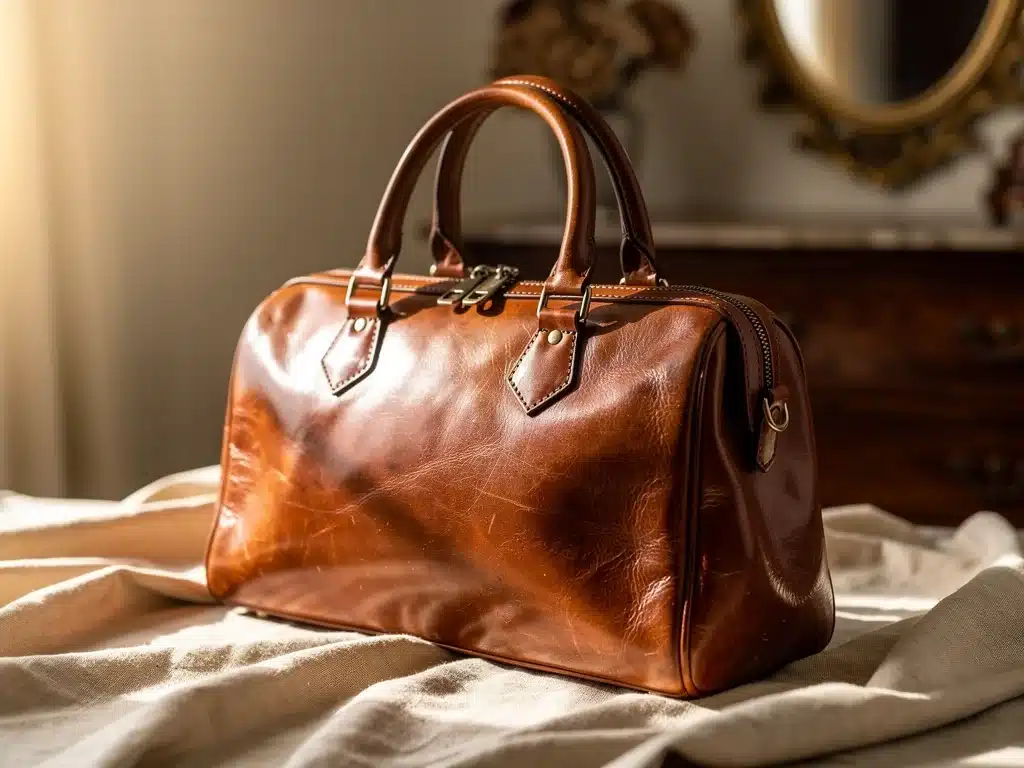
Are you holding onto a piece of history, a vintage leather handbag that tells a story, but perhaps shows its age? This practical guide: restoring vintage leather handbags – 7 steps to increase resale value by 15% in 2026 offers a roadmap to breathe new life into these cherished accessories. Far more than just a repair, restoration is an art that can significantly boost the market appeal and financial worth of your vintage treasures.
Understanding the Value of Vintage Leather Handbags
Vintage leather handbags are more than just accessories; they are tangible pieces of fashion history, embodying craftsmanship and design sensibilities from bygone eras. Their appeal lies in their unique character, often superior construction, and the stories they carry. Recognizing this inherent value is the first step towards a successful restoration project.
The market for vintage fashion continues to grow, driven by a desire for sustainability, individuality, and a rejection of fast fashion. A well-preserved or expertly restored vintage handbag can command a premium, especially if it’s from a renowned designer or represents a significant trend. This appreciation for authenticity and enduring quality fuels the potential for increased resale value.
The Allure of Authenticity and Craftsmanship
Modern mass-produced bags often lack the meticulous attention to detail and high-quality materials found in vintage pieces. Many vintage leather handbags were handcrafted using full-grain leather, durable hardware, and traditional techniques that are less common today. This superior craftsmanship contributes significantly to their longevity and aesthetic appeal.
- Unique Designs: Vintage bags often feature designs that are no longer in production, making them rare and desirable.
- Quality Materials: Historically, premium leathers and robust hardware were standard, ensuring durability.
- Sustainable Choice: Opting for vintage is an eco-friendly decision, reducing demand for new production.
- Investment Potential: Certain designer vintage bags appreciate in value over time, becoming collectible assets.
Understanding the provenance and inherent quality of your vintage leather handbag is crucial before embarking on any restoration. Researching the brand, materials, and typical wear patterns will inform your approach and help you maintain its historical integrity. This foundational knowledge ensures that your efforts are directed toward enhancing, rather than detracting from, its original value.
Step 1: Thorough Cleaning and Initial Assessment
Before any restoration work can begin, a thorough cleaning and detailed assessment are paramount. This initial stage allows you to understand the bag’s condition, identify specific areas of damage, and determine the most appropriate restoration techniques. Rushing this step can lead to further damage or ineffective treatments.
Start by emptying the bag completely and gently removing any loose dirt or debris from both the interior and exterior. A soft brush or a lint roller can be effective for this. Pay close attention to crevices and corners where dust can accumulate. Once the superficial dirt is gone, you can begin a more detailed inspection.
Detailed Inspection for Damage Types
Carefully examine the entire bag for various types of damage. This includes assessing the leather for dryness, cracks, scuffs, stains, and discoloration. Check the stitching for any loose threads or unraveling. Inspect the hardware—zippers, clasps, buckles—for rust, tarnishing, or functional issues. Don’t forget the lining; tears, stains, or odors here can also diminish value.
- Leather Condition: Look for dry patches, surface cracks, deep scratches, and areas of color loss.
- Hardware Integrity: Test all zippers and clasps; check for corrosion or missing components.
- Stitching: Examine seams for signs of wear, fraying, or broken threads that need re-stitching.
- Lining and Interior: Note any tears, ink stains, or persistent odors that require special attention.
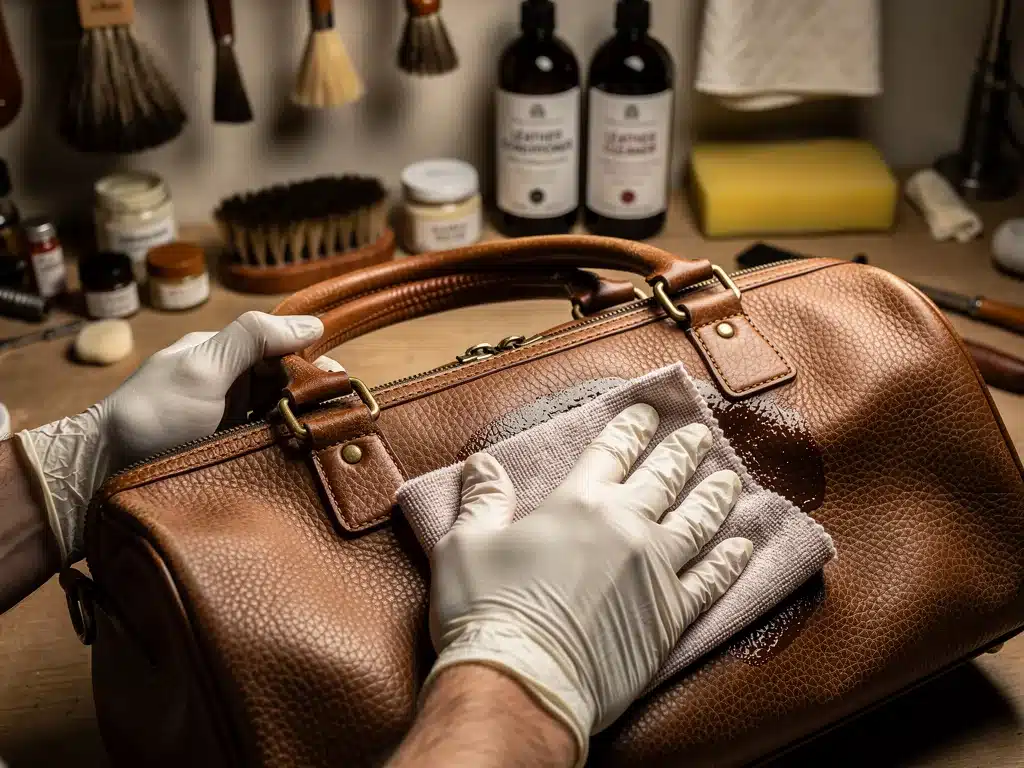
For cleaning, use a mild leather cleaner specifically designed for vintage or delicate leather. Apply it sparingly with a soft, clean cloth, working in small sections. Avoid harsh chemicals or excessive moisture, which can strip natural oils or cause water damage. After cleaning, allow the bag to air dry completely away from direct sunlight or heat. This comprehensive initial assessment and gentle cleaning lay the groundwork for a successful and targeted restoration process, ensuring that each subsequent step addresses the specific needs of your unique vintage piece.
Step 2: Deep Cleaning and Stain Removal Techniques
Once the initial assessment and gentle cleaning are complete, the next crucial phase involves deep cleaning and targeted stain removal. This step aims to eliminate ingrained dirt, persistent odors, and various types of stains that detract from the handbag’s overall appearance and hygiene. Proper technique is vital to avoid damaging the delicate vintage leather.
For deep cleaning, continue using a high-quality, pH-neutral leather cleaner. Apply it with a soft cloth or sponge, working in small circular motions. For textured or embossed leather, a soft-bristled brush can help lift dirt from crevices. Always test the cleaner on an inconspicuous area first to ensure it doesn’t cause discoloration or adverse reactions. After cleaning, wipe the surface with a damp cloth to remove any residue, then dry thoroughly with a clean, soft towel.
Addressing Common Stains and Odors
Different types of stains require specific approaches. For oil-based stains, a small amount of cornstarch or talcum powder can be applied to absorb the oil, left for several hours, and then gently brushed off. Water stains often respond well to a light application of distilled water followed by gentle drying and conditioning. Ink marks are particularly challenging and may require professional intervention or a specialized ink remover designed for leather, used with extreme caution.
- Oil Stains: Use absorbent powders like cornstarch; follow with a gentle wipe.
- Water Marks: Lightly dampen the entire affected panel with distilled water for even drying.
- Ink Stains: Employ specialized leather ink removers or consult a professional; test rigorously.
- Mildew/Mold: A solution of equal parts rubbing alcohol and water can be used cautiously, followed by thorough drying.
Persistent odors, especially from smoke or prolonged storage, can be tackled by placing the bag in a sealed container with odor absorbers like activated charcoal, baking soda, or cedar chips for several days. Ensure these absorbers do not directly touch the leather. For the interior lining, if non-leather, a gentle fabric cleaner or a steam cleaner (used sparingly) can refresh and sanitize. This meticulous deep cleaning and stain removal process ensures that the leather is pristine and ready for subsequent conditioning and repair steps, significantly contributing to the bag’s renewed appeal and hygiene.
Step 3: Leather Conditioning and Hydration for Suppleness
After the thorough cleaning and stain removal, the leather will likely be dry and in need of deep conditioning and hydration. This step is critical for restoring the leather’s suppleness, preventing cracks, and bringing back its natural luster. Proper conditioning nourishes the leather fibers, extending the bag’s life and enhancing its tactile quality.
Choose a high-quality leather conditioner that is free of silicone, waxes, and petroleum-based products, as these can clog pores or lead to an unnatural finish. Look for conditioners with natural oils and emollients designed to penetrate and moisturize. Apply a small amount of conditioner to a clean, soft cloth and gently rub it into the leather in circular motions. Work in small sections, ensuring even coverage.
Techniques for Optimal Absorption and Finish
Allow the conditioner to fully absorb into the leather for at least 15-30 minutes, or even longer for very dry bags. You might notice the leather darkening slightly as it absorbs the product, which is often a sign of effective hydration. After absorption, buff the leather gently with a clean, dry cloth to remove any excess conditioner and bring out a soft sheen. This buffing action also helps to distribute the oils evenly and prevent a sticky residue.
- Patch Test: Always test conditioner on an inconspicuous area first to check for color changes.
- Moderate Application: Apply thin, even layers; avoid over-saturating the leather.
- Patience is Key: Allow ample time for the conditioner to penetrate the leather fibers.
- Buffing: Use a clean, soft cloth to buff away excess and reveal a subtle shine.
For severely dry or cracked areas, you might need to apply multiple thin layers of conditioner over several days, allowing each layer to fully absorb before applying the next. This gradual process ensures deep penetration and helps to soften stiff areas without overloading the leather. Consistent conditioning is not just a restoration step but also a vital part of ongoing maintenance, ensuring the vintage leather remains supple and resistant to future damage, thereby preserving its beauty and increasing its long-term resale value.
Step 4: Repairing Minor Damage and Restoring Hardware
With the leather now clean and conditioned, the focus shifts to repairing minor damage and restoring the bag’s hardware. These details significantly impact the overall appearance and functionality of the handbag, directly influencing its perceived value. Addressing these issues meticulously ensures a complete and professional restoration.
Minor leather damage, such as shallow scratches and scuffs, can often be camouflaged or repaired. For light scratches, gentle buffing with a soft cloth after conditioning can sometimes lessen their appearance. Deeper scuffs might benefit from a specialized leather repair cream or filler, carefully applied and blended to match the surrounding texture. Always choose products that are compatible with the leather type and color, testing them first in an unseen area.
Hardware Restoration and Stitching Repair
Hardware can often be restored to its former glory. Tarnished metal components like buckles, clasps, and zippers can be cleaned with appropriate metal polish, applied with a soft cloth and careful attention to avoid contact with the leather. For rust, a very fine steel wool or specialized rust remover can be used, again with extreme caution. If hardware is broken or missing, sourcing authentic vintage replacements can be challenging but is often worth the effort for preserving originality. Sometimes, a high-quality replica is the best alternative.
- Scratch Repair: Use leather repair creams for deeper scratches, blending carefully.
- Tarnish Removal: Polish metal hardware with appropriate cleaners, avoiding leather contact.
- Rust Treatment: Employ fine steel wool or rust remover cautiously; consider professional help for severe cases.
- Stitching: Hand-stitch loose threads or reinforce weak seams with matching thread for durability.
Loose or broken stitching also needs immediate attention. For minor unraveling, a needle and strong, matching thread can be used to re-stitch the affected area by hand. If the damage is extensive or requires specialized tools, consulting a professional leather repair artisan is advisable. Ensuring all hardware is functional and aesthetically pleasing, and that stitching is secure, contributes immensely to the bag’s structural integrity and visual appeal, making it a more attractive and valuable item for resale.
Step 5: Color Restoration and Finishing Touches
Color restoration is a transformative step that can dramatically enhance the appearance of a vintage leather handbag, especially if it has faded or suffered from discoloration over time. This process revitalizes the bag’s original hue, making it look vibrant and fresh, while also protecting the leather for future use. It’s a delicate operation requiring precision and patience.
Before applying any color, ensure the leather is perfectly clean, dry, and free of any oils or residues from previous steps. For minor fading, a good quality leather dye or recoloring balm can be applied. Choose a product that closely matches the bag’s original color. Apply thin, even coats with a sponge or applicator pad, allowing each coat to dry completely before applying the next. Building up the color gradually prevents an unnatural or painted look.
Achieving a Natural and Durable Finish
For more significant color loss or to achieve a uniform finish, specialized leather paints or professional dyes might be necessary. These products are formulated to adhere well to leather and provide a durable, flexible finish. Again, multiple thin layers are preferable to one thick coat. After the desired color is achieved and fully dry, a leather sealant or topcoat should be applied. This step is crucial for protecting the newly restored color from scuffs, water, and UV damage, and for providing a consistent sheen.
- Color Matching: Select dyes or balms that perfectly match the original shade of the leather.
- Thin Layers: Apply color in multiple thin coats for a natural and even appearance.
- Sealing: Use a leather sealant to protect the restored color and enhance durability.
- Buffing for Sheen: A final gentle buff can bring out a natural luster and smooth the surface.
The finishing touches also include polishing any restored hardware and ensuring the interior lining is clean and intact. If the lining was torn, it should be carefully repaired or, in some cases, professionally replaced. A light application of a leather protector spray can offer an additional layer of defense against future wear. The goal is to create a cohesive, well-maintained appearance that highlights the bag’s vintage charm while presenting it in its best possible condition, ready to captivate potential buyers and significantly increase its resale value.
Step 6: Interior Cleaning and Odor Neutralization
The interior of a vintage leather handbag often bears the brunt of its past life, accumulating dust, spills, and odors that can significantly detract from its overall appeal and value. A thorough interior cleaning and effective odor neutralization are just as important as restoring the exterior leather. A pristine interior assures prospective buyers of the bag’s overall care and hygiene.
Begin by carefully removing all contents and turning the lining inside out if possible. Use a lint roller or a small vacuum cleaner with a brush attachment to remove loose debris, dust, and crumbs. For fabric linings, a gentle fabric cleaner or a solution of mild soap and water can be used on a soft cloth, working in small sections. Avoid over-wetting the fabric, as this can lead to water stains or mildew. Allow the lining to air dry completely before proceeding.
Eliminating Stubborn Odors and Stains
Stains on the lining, such as ink or makeup, require targeted treatment. For ink, a small amount of rubbing alcohol on a cotton swab can be dabbed onto the stain, being careful not to spread it. Makeup stains may respond to a gentle stain remover designed for fabrics. Always test these products on an inconspicuous area first. If the interior is leather, follow the same cleaning and conditioning steps as the exterior, using appropriate leather products.
- Debris Removal: Use lint rollers or a mini-vacuum for thorough cleaning of the interior.
- Fabric Lining Care: Apply gentle fabric cleaner sparingly, avoiding excessive moisture.
- Odor Absorption: Place odor absorbers (baking soda, charcoal) inside for several days.
- Lining Repair: Mend small tears or loose seams with a needle and thread to restore integrity.
For stubborn odors, such as smoke, mildew, or perfume, place open containers of activated charcoal, baking soda, or crumpled newspaper inside the bag and seal it in a larger plastic bag or container for several days to a week. These materials effectively absorb unwanted smells. Airing the bag out in a well-ventilated area, away from direct sunlight, can also help. Finally, inspect the lining for any tears or frayed seams and repair them neatly. A clean, fresh-smelling, and intact interior elevates the perceived value and desirability of the vintage handbag, making it truly ready for its next owner.
Step 7: Protection, Storage, and Photography for Resale
The final step in restoring vintage leather handbags involves protecting your hard work, ensuring proper storage, and effectively presenting the bag for resale. These elements are crucial for maintaining the bag’s renewed condition and maximizing its market appeal, ultimately contributing to that target 15% increase in resale value by 2026.
After all restoration work is complete, apply a high-quality leather protector spray. This creates an invisible barrier against moisture, stains, and UV damage, helping to preserve the leather and its restored color. Ensure the protector is suitable for vintage leather and allow it to dry completely. This proactive measure significantly extends the life of your restoration.
Optimal Storage and Professional Photography
Proper storage is vital for preventing future damage. Stuff the bag with acid-free tissue paper or soft cloths to help it maintain its shape and prevent creasing. Avoid using newspaper, as the ink can transfer. Store the bag in a breathable dust bag (never plastic) in a cool, dry place away from direct sunlight and extreme temperatures. Humidity control is important to prevent mold or excessive dryness. Periodically air out the bag and re-stuff it if needed.
- Leather Protection: Apply a suitable leather protector spray to guard against elements.
- Shape Preservation: Stuff the bag with acid-free tissue to maintain its original form.
- Breathable Storage: Use a dust bag and store in a cool, dry, dark environment.
- High-Quality Photography: Capture detailed, well-lit photos from multiple angles, highlighting condition.
When preparing for resale, high-quality photography is non-negotiable. Take clear, well-lit photos from multiple angles: front, back, sides, bottom, interior, and close-ups of hardware and any unique features. Include photos of any minor imperfections that remain, as transparency builds trust. Write a detailed description that highlights the bag’s history, materials, and the extent of the restoration work, emphasizing its renewed condition. A well-presented, professionally restored vintage leather handbag stands out in the market, attracting discerning buyers and commanding a higher price, making your investment in restoration truly worthwhile.
| Key Restoration Step | Brief Description |
|---|---|
| Thorough Cleaning | Remove surface dirt and assess damage before deeper treatment. |
| Leather Conditioning | Rehydrate and soften dry leather, preventing cracks and enhancing suppleness. |
| Color Restoration | Revitalize faded colors and protect with a sealant for a fresh, durable look. |
| Final Presentation | Protect, store properly, and photograph professionally for optimal resale value. |
Frequently Asked Questions About Vintage Handbag Restoration
The frequency of conditioning depends on the climate and how often the bag is used. Generally, conditioning every 3-6 months is recommended to keep the leather supple and prevent drying. In very dry environments or with frequent use, you might condition more often, checking the leather’s feel for signs of dryness.
Most common leather types, like full-grain, top-grain, and even some corrected-grain leathers, can be restored. However, delicate leathers like suede, nubuck, or exotic skins require specialized techniques and products, often best handled by professionals. The extent of damage also plays a significant role in restoration success.
Major mistakes include using harsh chemicals, over-wetting the leather, applying too much conditioner, or using non-leather-specific products. Not patch-testing products on an inconspicuous area can also lead to irreversible damage. Always research and proceed with caution, especially with valuable pieces.
While results vary, a well-executed restoration can realistically increase a vintage handbag’s resale value by 10-25%, with our guide targeting a 15% increase by 2026. This is especially true for designer bags or those with significant historical value, where condition is paramount for collectors and enthusiasts.
You should consider professional restoration for severe damage like deep tears, extensive cracking, complex hardware repairs, or significant color loss on highly valuable bags. If you lack confidence or specialized tools, a professional can prevent further damage and ensure a higher quality, lasting restoration.
Conclusion
Embarking on the journey to restore vintage leather handbags is both a rewarding endeavor and a smart investment. By meticulously following these 7 detailed steps—from initial cleaning and deep conditioning to color restoration and strategic presentation—you can transform a faded relic into a vibrant, sought-after accessory. This comprehensive approach not only preserves a piece of fashion heritage but also significantly enhances its financial worth, positioning your restored vintage handbag to achieve an impressive 15% increase in resale value by 2026. The care and attention invested in bringing these timeless pieces back to life truly pays dividends, ensuring their legacy continues for generations to come.


